Using DeepSkyStacker (DSS) for Stacking Astro Images
This is my current favorite choice for astro stacking of images. Registax was my old favorite, but it's developing irregularities, at least on our Win10 computers in the Cabrillo College lab room. I've just re-acquainted myself with how to use it, on a Win10 laptop...
Downloading DeepSkyStacker
The current version, as I write this, is 4.2.6. I downloaded it from CNN, which is a reputable repository of downloadable software. It's only a few meg's, and downloads quickly and installs without fuss. I used the 64bit version.
Selecting Images and Setup
First you will select your set of images to be stacked. These are called your "light images" in the documentation; the images with your deep sky object. Left-click on the red lettered icon at the top of the left panel "Open Picture Files"

Clicking the "Open Picture Files" will pop up a file explorer box. You click on your first image, hold down the "shift" key and then click on your last in the image set, and it'll highlight all files in between. |
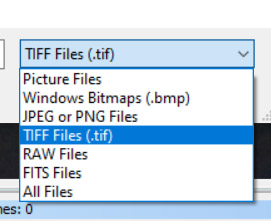
Here's the allowed formats. Best to use tiff or RAW files, or FITS, as they keep resolution best. |
|
Next you will load any calibration images. Again on the left panel, you click on the appropriate file type: "dark", "flat", etc. Again it'll pop up a file explorer box and you select your files. I use just dark frames and flat fields. Bias is normally accomplished automatically when doing a dark-subtract. The files will now show up in the bottom center panel.
Next, you click "check all". and a filled check box will appear next to each file. If there are any that you don't want to include in your stack, now is the time to uncheck them (the check mark toggles on/off as you click on it) or cut them. It will list all your selected images, of all types (darks, flats, light images, etc.). I typically will take 3 dark frames, with the intent of then making a single dark frame that is a median of the 3. That way, any temporary hot pixel (like from a cosmic ray) will not be included in the final dark frame. DeepSkyStacker will do that median process for you.
Then click "register checked images" from the left panel. This brings up a menu box. It will default to the "Recommended settings", which I typically will keep. If you click the "advanced" tab, you can move a slider which has the effect of DSS finding more or fewer stars to act as the stacking points. The software will stack your images on as many stars as you have the memory and patience for. The slider at the low end means more stars. Slide higher to get fewer stars. If you're using a telescope with some magnification, the field distortion will be so low that it hardly matters how many stars you choose, but if you're shooting a wide angle shot, then you'll want more stars, especially if the sequence was un-guided. Go for dozens.
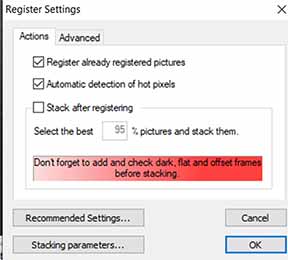
Best to have it check marked likt this. Don't stack after registering, make that a separate step. If you believe all your images are equally good, then have it select the best 100% of images. If there may be a few bad ones, use your judgement. Only stack the best images. Image quality improves only as the square root of the number of images, so you'll rapidly get to a point of diminishing returns on additional exposures. |

Click on 'advanced' tab to access these choices. I've not experimented with the median filter, but it may be a good icea. You can click on "compute the number of detected stars" that it will use in the solution. A few dozen ought to be plenty. |

Click on 'stacking parameters' to further optimized. I leave it at "tiff" for any intermediate files, which is a lossless format. I don't click making a calibrated image for each separate image, unless you have a sequence with differing calibration images. Not typical. |
|
Now click "OK" to take you back out to the main page.
If You're Shooting a Sequence on a Comet...
If you're stacking a set of comet pictures, there's another intermediate step needing to be done. You need to tell DSS where the comet is on each and every one of your images. Here's how:
* Click on one of your first image. There'll be now a green comet image (a cartoon star with a tail).
Click on that green comet, and it'll then provide a green target which you can center on your comet nucleus. To help get it well center, you zoom in with your mouse wheel, Press "shift" and left-mouse click to center the green target on your comet nucleus, then release the shift key and left-click again and it'll put a small pink circle with your nucleus centered. On the menu, you will probably want to tell it to "save without asking", so that once you're happy with the pink circle centered on your nucleus, you can then just move on to the next image and do the same thing. It'll automatically save the comet position for each image every time you click and show the pink little circle, and revise it if you keep trying to better center it.
Only now, are you ready to stack your images. On the left side panel, click the red "Stack Checked Images"

"recommended" paramters is usually fine, so skip clicking on that button and then click on the "stacking parameters" button. |

... which brings up this menu. "Standard" is fine. If you have extremely big pixels or extremely sharp images, you might want to drizzle 2x or 3x for sub-pixel help. But for my images I don't find it worth the CPU time. I go straight to the next tab: Comet |

You can see 3 options. You can stack only on the stars, then your comet will blur. Or you can stack only on the comet, and the stars will trail. Or you can choose the 3rd option which gives you both a sharp comet and sharp focused stars. It takes 2x as long to do, but usually gives the best image unless you like those star-trailed comet shots. |
|
Then you click "OK" to get out, and "OK" again to take the "Recommended settings". And then it'll start stacking. For my 32 shot Comet ZTF images, it took about a minute to do on my Win10 Dell laptop with 8GB memory.
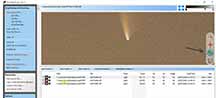
It'll then show the final image. DSS doesn't do any post-processing, and in fact it'll even look black-and-white. But relax, it's still a color image. You can do some curving and color histogram moving, but since all the necessary information is already saved in the .TIFF format file, I just go go the left panel, middle, and click "save picture to file" and save it. Then you have your TIFF file which you can open in Photoshop or GIMP, or whatever you like, and do polishing.


